Soil For Snake Plant Repotting – Your A-To-Z Guide For A Thriving
We’ve all heard it, right? Snake plants are the superheroes of the houseplant world—tough, resilient, and almost impossible to kill. But if there’s one moment that can make even a seasoned gardener a little nervous, it’s repotting day. It feels like a high-stakes operation, and the single most critical factor for success is the soil.
I promise that by the end of this guide, you will feel completely confident about choosing and mixing the perfect medium for your beloved plant. Getting the soil for snake plant repotting right is the secret to preventing root rot and encouraging strong, vibrant growth for years to come.
So, grab your gardening gloves! We’re going to dive deep into why the right soil is so crucial, share my favorite DIY soil recipes, review the best pre-made options, and walk you through a complete soil for snake plant repotting guide. Let’s get your snake plant into its new, happy home.
What's On the Page
- 1 Why the Right Soil for Snake Plant Repotting is Non-Negotiable
- 2 The Anatomy of the Perfect Snake Plant Soil Mix
- 3 My Go-To DIY Soil Recipes for Happy Snake Plants
- 4 The Best Pre-Made Soil Mixes: A Gardener’s Shortcut
- 5 Your Step-by-Step Soil for Snake Plant Repotting Guide
- 6 Common Problems with Soil for Snake Plant Repotting (And How to Fix Them)
- 7 Frequently Asked Questions About Soil for Snake Plant Repotting
- 8 You’ve Got This!
Why the Right Soil for Snake Plant Repotting is Non-Negotiable
Before we get our hands dirty, let’s talk about the why. Understanding this is the key to becoming a truly intuitive gardener. Snake plants (Dracaena trifasciata, formerly Sansevieria) are native to the arid, rocky regions of West Africa. They are not used to sitting in dense, wet soil.
Think about their natural environment: dry, gritty, and fast-draining. Our goal is to replicate that environment in a pot. Using standard, all-purpose potting soil straight from the bag is one of the fastest ways to sentence a snake plant to a slow, waterlogged death from root rot.

🌿 The Companion Planting & Gardening Book (eBook)
Bigger harvests, fewer pests — natural pairings & simple layouts. $2.40
Get – $2.40
🪴 The Pest-Free Indoor Garden (eBook)
DIY sprays & soil tips for bug-free houseplants. $1.99
Get – $1.99The benefits of soil for snake plant repotting with a proper mix are huge:
- Prevents Root Rot: This is the big one. A well-draining mix allows excess water to escape quickly, keeping the roots healthy and free from the fungal diseases that thrive in soggy conditions.
- Promotes Strong Root Growth: An airy, chunky mix gives roots the space they need to breathe and grow strong. Compacted soil suffocates roots, stunting the plant’s growth.
- Mimics Natural Habitat: A happy plant is one that feels at home. Providing a soil mix that mimics its native ground reduces stress and encourages it to thrive.
- Reduces Pest Issues: Pests like fungus gnats love consistently moist soil. A fast-drying mix makes your plant a much less attractive home for these annoying critters.
The Anatomy of the Perfect Snake Plant Soil Mix
Creating the ideal soil isn’t about finding one magic ingredient; it’s about creating a balanced blend that provides three key things: structure, drainage, and aeration. Think of it as building the perfect foundation for a house. Here’s a breakdown of the core components.
Drainage is King
This is the most critical element. Your mix needs materials that create air pockets and allow water to flow through freely. Without excellent drainage, you risk the dreaded root rot, which is the number one killer of snake plants.
Key Ingredients: Perlite, pumice, coarse sand, or small lava rocks.
The Importance of Aeration
Aeration is closely related to drainage. It refers to the amount of oxygen available to the roots. Roots need to “breathe” to function properly. A light, airy mix ensures they get the oxygen they need to absorb nutrients and water efficiently.
Key Ingredients: Orchid bark, coco husk chips, perlite.
A Touch of Water Retention
While snake plants hate wet feet, they do need some moisture to draw from between waterings. The trick is to use materials that hold a little water without becoming dense or swampy. This is where a small amount of organic matter comes in.
Key Ingredients: Peat moss, coco coir, or a quality indoor potting mix.
My Go-To DIY Soil Recipes for Happy Snake Plants
Mixing your own soil is incredibly satisfying and allows you to create the perfect blend for your specific environment. Don’t worry—it’s easier than it sounds! Here are a couple of my tried-and-true recipes. These are great starting points for how to soil for snake plant repotting like a pro.
The Super Simple Starter Mix (Great for Beginners)
This is a fantastic, no-fuss recipe that gets the job done beautifully. It’s a huge step up from straight potting soil.
Ingredients:
- 2 parts Cactus & Succulent Potting Mix
- 1 part Perlite or Pumice
That’s it! Simply mix them together thoroughly in a bucket or on a tarp. The pre-made cactus mix already has good drainage, and adding extra perlite or pumice makes it even better, providing that crucial aeration snake plants crave.
The “Greeny Gardener” Pro Mix (For Ultimate Performance)
If you want to give your snake plant the absolute best, this mix provides superior aeration and structure. My plants have thrived in this blend for years.
Ingredients:
- 1 part Indoor Potting Mix (or coco coir)
- 1 part Perlite or Pumice
- 1 part Orchid Bark or Coco Husk Chips
- A handful of Horticultural Charcoal (optional, but great for “sweetening” the soil)
This mix is chunky, airy, and drains like a dream. The orchid bark creates large air pockets that prevent compaction, and the charcoal helps to filter impurities. This is one of the top soil for snake plant repotting tips I can offer!
A Note on Sustainable & Eco-Friendly Soil for Snake Plant Repotting
Many gardeners are moving away from peat moss due to environmental concerns about its harvesting. If you’re looking for a more eco-friendly soil for snake plant repotting, I highly recommend using coco coir as a substitute. It’s a renewable byproduct of the coconut industry, has excellent water retention and aeration properties, and re-wets much more easily than dry peat moss.
The Best Pre-Made Soil Mixes: A Gardener’s Shortcut
No time or space to mix your own? No problem! There are excellent pre-made options available that will work wonderfully. The key is knowing what to look for.
Your best bet is to purchase a high-quality Cactus and Succulent Potting Mix. These are specifically formulated for arid plants and will have the drainage your snake plant needs.
When you’re at the garden center, look for bags that feel light for their size and list ingredients like perlite, pumice, sand, or forest products on the label. Avoid any bags that feel heavy, dense, or are labeled as “moisture-retaining.”
Pro Tip: Even with a pre-made cactus mix, I often stir in an extra handful or two of perlite or pumice just to be safe. It’s a simple step that provides extra insurance against overwatering.
Your Step-by-Step Soil for Snake Plant Repotting Guide
Alright, you’ve chosen or mixed your perfect soil. Now for the main event! Follow these soil for snake plant repotting best practices for a smooth and successful transition.
- Choose the Right Time: The best time to repot is during the spring or summer when the plant is in its active growing season. Avoid repotting in the winter if you can.
- Pick the Right Pot: Select a new pot that is only 1-2 inches larger in diameter than the current one. Snake plants love being a bit snug. Crucially, ensure the pot has a drainage hole. This is not optional!
- Gently Remove the Plant: Turn the current pot on its side and gently tap and squeeze it to loosen the root ball. Carefully slide the plant out. Try not to pull it by its leaves.
- Inspect the Roots: Take a moment to look at the roots. Healthy roots are typically firm and white or yellowish. If you see any black, mushy, or smelly roots, that’s root rot. Trim these off with clean, sharp scissors.
- Prepare the New Pot: Cover the drainage hole with a small piece of mesh or a coffee filter to prevent soil from washing out. Add a layer of your fresh, new soil to the bottom of the pot, enough so the top of the root ball will sit about an inch below the rim.
- Position Your Plant: Center the snake plant in the new pot. Hold it in place with one hand while you backfill around the sides with your new soil mix.
- Settle the Soil: Gently tap the sides of the pot on your work surface to help the soil settle around the roots. You can lightly press the soil down, but avoid packing it in tightly. We want to keep it airy!
- To Water or Not to Water?: This is a key step. I recommend waiting at least a week before watering. This gives any damaged roots time to heal and callous over, drastically reducing the risk of rot in the new pot. This is a core part of any good soil for snake plant repotting care guide.
Common Problems with Soil for Snake Plant Repotting (And How to Fix Them)
Even with the best intentions, you might run into a few hiccups. Don’t panic! Here are some common problems with soil for snake plant repotting and their simple solutions.
Problem: The Soil Stays Wet for Weeks
The Cause: Your soil mix is too dense and lacks drainage. It’s likely holding too much water, which is a recipe for disaster.
The Fix: You need to act quickly. Gently repot the plant again into a much chunkier, more aerated mix. Add more perlite, pumice, or orchid bark to your existing soil to drastically improve its drainage.
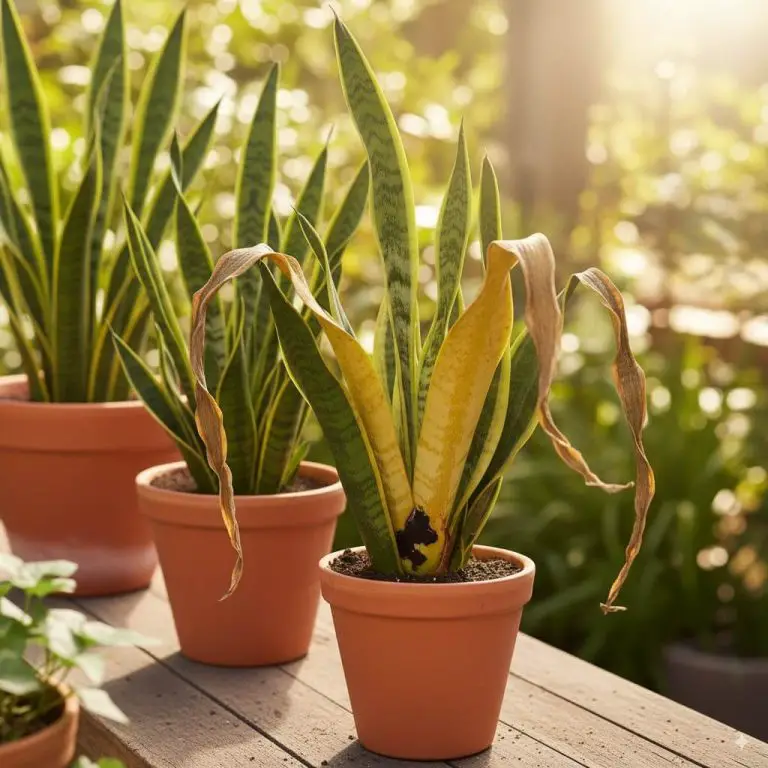
Problem: My Repotted Plant’s Leaves are Wrinkling
The Cause: This can be confusing. It could mean underwatering, but right after a repot, it’s often a sign of transplant shock or damaged roots that aren’t able to absorb water yet.
The Fix: Be patient. Do not drench the plant with more water! Stick to your watering schedule (waiting until the soil is 100% dry). The plant needs time to establish its new root system. The wrinkling should resolve as it recovers.
Problem: I See Tiny Flying Bugs Around the Soil!
The Cause: Hello, fungus gnats. These pests lay their eggs in the top layer of consistently moist soil.
The Fix: Your soil is staying too wet. Allow the soil to dry out completely between waterings. The fast-draining soil mixes we’ve discussed are your best defense. You can also use sticky traps to catch the adults and break the life cycle.
Frequently Asked Questions About Soil for Snake Plant Repotting
Can I use regular potting soil for my snake plant?
It’s highly discouraged. Regular potting soil is designed to retain moisture, which is the opposite of what a snake plant needs. It will stay wet for too long, leading to a high risk of root rot. At a minimum, you should amend it heavily with perlite or pumice.
How often should I repot my snake plant?
Snake plants prefer to be root-bound and only need repotting every 2-5 years. You’ll know it’s time when you see roots growing out of the drainage hole, the pot is bulging or cracking, or water runs straight through without seeming to wet the soil.
What’s the difference between perlite and pumice?
Both are fantastic for aeration and drainage. Perlite is a super-light volcanic glass that can sometimes float to the top of the soil when watered. Pumice is a heavier volcanic rock that stays mixed in better. Both work great—use whichever is more accessible to you!
You’ve Got This!
Repotting a snake plant doesn’t have to be a source of anxiety. By focusing on creating a well-draining, airy soil mix that honors the plant’s native roots, you are setting it up for a long, healthy, and beautiful life.
Whether you choose a simple DIY recipe, our “Pro Mix,” or a quality store-bought bag, you now have the knowledge to make the right choice with confidence. Remember these soil for snake plant repotting tips, trust the process, and watch your snake plant thrive in its new home.
Happy gardening!
- Grass Vine Weed – Your Expert Guide To Identification, Prevention, And - January 8, 2026
- Cutworms Seedlings – Protect Your Young Plants From Devastating Damage - January 8, 2026
- Colorful Summer Bulb Flowers – Your Essential Guide To Dazzling, - January 8, 2026